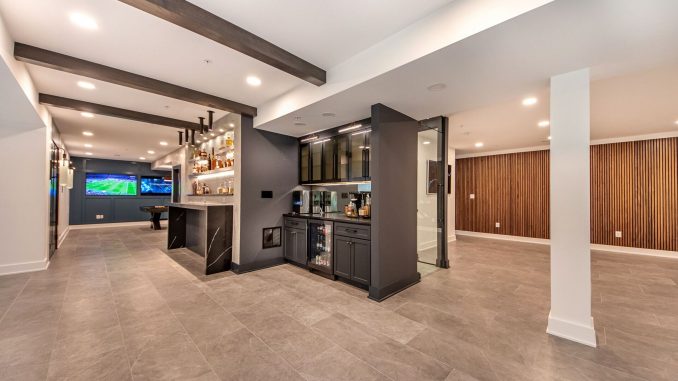
Finishing your basement transforms underutilized square footage into a functional, comfortable living area tailored to your family’s needs. Whether you envision a cozy media room, a home office, an extra bedroom with a bathroom, or a fitness studio, a well-executed basement renovation adds value, expands living space, and enhances overall enjoyment of your home. Here’s what you need to know to plan and execute a successful basement finishing project.
Assessing Your Space and Setting Goals
Before swinging a hammer, begin with a thorough evaluation of your existing basement condition. Check for moisture issues—damp spots, mold, or musty odors—as these must be resolved to protect walls, flooring, and any furniture you place below grade. Inspect for cracks in foundation walls and floors; minor hairline cracks can often be sealed with epoxy injections, but larger structural issues call for professional foundation repair.
Next, define your goals and priorities. Will you need plumbing for a bathroom or wet bar? How much natural light is available, and will you install egress windows for safety and added daylight? Consider ceiling height: building codes generally require at least 7 feet of finished ceiling, so factor in ductwork, piping, and wiring. Create a rough layout that designates zones—living, storage, mechanical—and estimate square footage for each. Early planning saves costly modifications later.
Designing an Efficient Layout
Once goals are established, work with a designer or architect to draft floor plans. Key considerations include:
- Traffic Flow: Plan hallways and doorways to avoid narrow bottlenecks.
- Mechanical Access: Enclose but remain able to access HVAC, electrical panels, and sump pumps.
- Natural Light & Egress: Code-compliant window wells not only improve safety but also make the space feel brighter.
- Sound Control: If you’re creating a home theater or office, incorporate resilient channels or acoustic insulation to minimize noise transfer upstairs.
Use 3D renderings or mood boards to visualize finishes, color palettes, and furniture placement. Early collaboration with a professional helps you balance aesthetics with code requirements and structural constraints.
Choosing Materials for Durability and Comfort
Because basements sit below grade, moisture-resistant materials are crucial:
- Framing: Use pressure-treated lumber or metal studs for lower wall framing.
- Insulation: Closed-cell spray foam seals air leaks and halts moisture intrusion, while rigid foam boards behind stud walls offer thermal performance and vapor control.
- Drywall: Standard drywall is acceptable if moisture issues have been addressed; for peace of mind, consider moisture-resistant “green board.”
- Flooring: Engineered hardwood, luxury vinyl planks, or tile work well in basements. If budget is a concern, high-quality vinyl plank flooring resists moisture and mimics wood or stone. Installing a subfloor system with an air gap can help prevent dampness.
- Ceilings: Drop ceilings offer easy access to utilities, while painted drywall or exposed beams create a more polished, modern look—just ensure any ductwork or piping is insulated to control condensation and noise.
The Construction Process
A typical basement finishing timeline follows these phases:
- Permitting & Inspections
Submit plans to your local building department for review. Securing permits up front prevents delays and ensures work is inspected at key milestones. - Framing & Rough-Ins
Frame walls, soffits, and ceilings per your approved layout. Next, a licensed electrician and plumber install wiring, outlets, light fixtures, switches, and plumbing lines for sinks, toilets, or laundry. HVAC runs may require extending existing ducts or installing mini-split units for better temperature control. - Insulation & Vapor Barrier
Install insulation between studs and over rim joists to improve energy efficiency. A continuous vapor barrier on foundation walls helps block moisture. - Drywall Installation
Hang, tape, and finish drywall. Allow ample drying time before sanding to avoid uneven texture. - Finishes & Trim
Paint walls and ceilings with mold-inhibiting primer and paint. Install baseboards, door casings, and custom built-ins. Add any shelving, cabinetry, or bespoke features such as a wine cellar or media niche. - Flooring & Fixtures
Lay your chosen floor material, then install fixtures: lighting, plumbing fixtures, doors, and hardware. Test all systems—electrical outlets, plumbing drains, HVAC vents—to verify proper function. - Final Inspection
Schedule a final walk-through with the building inspector to confirm code compliance. Obtaining a certificate of occupancy (if required) ensures legally approved use of the space.
Budgeting and Return on Investment
Basement finishing costs vary widely based on scope, from $30 to $75 per square foot for basic renovations and up to $125+ per square foot for high-end custom work. Key budget drivers include:
- Scope of plumbing and electrical work
- Quality of finishes (e.g., custom cabinetry vs. stock units)
- Extent of structural modifications (adding egress windows or relocating support columns)
- Labor rates in your region
A finished basement typically yields a return of 70–80% on resale value, making it one of the most cost-effective home improvement projects. Plus, the added living space enhances daily enjoyment and can serve as a rental suite or in-law apartment for multigenerational living.
Maximizing Comfort and Utility
To make your basement a comfortable retreat:
- Optimize lighting: Combine recessed LEDs, wall sconces, and task lighting to counteract limited natural light.
- Control climate: Extend your HVAC system or install dedicated units; consider radiant floor heating for consistent warmth.
- Incorporate smart controls: Programmable thermostats, dimmable lights, and smart locks on basement egress doors add convenience and safety.
- Design versatile spaces: Use modular furniture or fold-away features so your basement can serve multiple functions—gym by day, guest suite by night.
Finishing your basement is an investment in both comfort and equity. By carefully assessing conditions, planning a practical layout, selecting durable materials, and following a disciplined construction process, you’ll create a functional, stylish space that meets your family’s needs and adds lasting value to your home. Start your basement transformation today—and unlock the full potential of every square foot!


